
Flow Blog Series 01:
Screen Flows
In the previous blog, we showed you why Flow is the way to go! There are 5 flow implementation types you can choose from, but no stress! In this blog series you will find out which one you can use best in what scenario. First up is Screen Flows!

You’re in control
Screen Flow can be added to a Lightning page, a Lightning Community, or can be launched from a Quick Action. You can control the header and footer for the screen. Moreover, control the navigation in between screens by enabling or disabling ‘Next or Finish’ and ‘Previous’ buttons. There is also a provision to ‘Pause’ the Flow which can be resumed by the users later. Screen element of Flow contains various standard input components. You can choose from Picklist, Button, File Upload and everything in between.
A standard ‘Display Text’ component is used to display information to users running the Flow. And of course, you are able to validate a user’s input in a Flow screen and display an error message accordingly to guide the user to correct the input. One of the coolest features is that you can make the Flow screen dynamic with Conditional visibility. Control when a component appears depending on the condition and logic you set and the screen will change dynamically during runtime.
TIP! The Spring 21 Release introduced a brand new feature where Multi Column Screen Flows can be created. Also, you can get more Screen components on the AppExchange. WOW!!
Create New Screen Flow
So First we need to go to Flows and click on New Flow button.
Here we find multiple types of Flow that are available for selection. We can choose between core Flow or we can select from existing templates. For this demo we will select Screen Flow. You can choose any type between freeform vs Auto-Layout.


Add Screen Component
Now we need to add a screen Component. If you are using Auto-Layout, just click the + icon and select screen component. Now, in the screen component list we see the new Multi Column Screen Flow component called Section. Drop this section on the screen. Congratulations! You’ve just made it possible for your screen flow to support up to 4 columns. Before this component was available we needed to do custom development, when more than 2 columns were needed. Finally we can just use flow instead of going with custom dev.

Create Account Screen
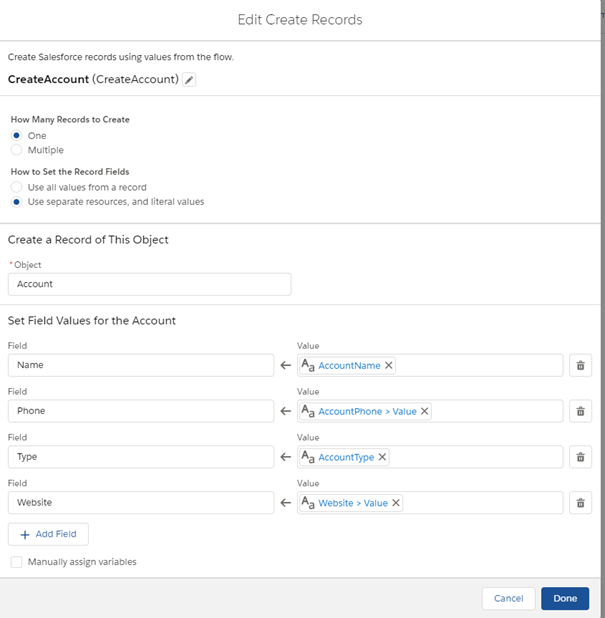
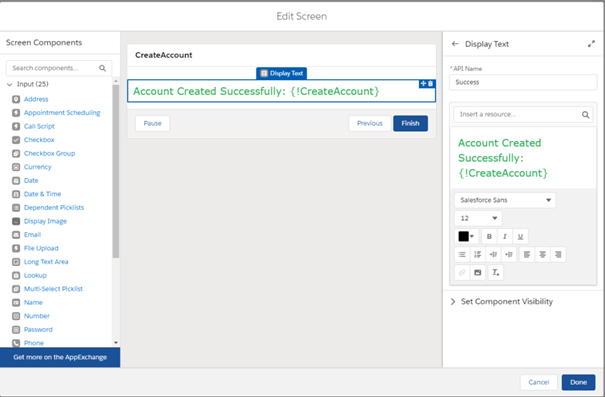
For the Demo Purpose we are going to create an Account using Multi Column Screen in Flow. To do so, we drag 4 fields here, but you can add more fields if you need. We also need one Create Record Action to create the Account Record. And finally we display a success message to users with the record id of the newly created account. For this we will create another screen component and display the success message.

So this is how our complete flow will look like after we save it. The best part of using Auto Layout is that we don’t need to connect different components. We just need to create them and they will auto connect with the previous one. We can also add fault path to handle any exception.
Flow Blog Series
Yeah! You know the way to go with that Screen Flow now. Read more blogs and find out about other flow types too.